


1. Turn on Apple Intelligence
Press Settings.


1. Turn on Apple Intelligence
Press Apple Intelligence & Siri.


1. Turn on Apple Intelligence
Press the indicator next to "Apple Intelligence" and follow the instructions on the screen to finish the activation.
2. Use Genmoji
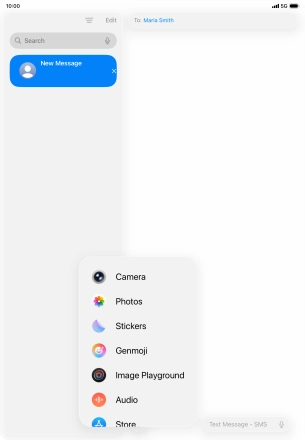
Open Messages and select an existing conversation or create a new message.


2. Use Genmoji
Press the add icon.


2. Use Genmoji
Press Genmoji.


2. Use Genmoji
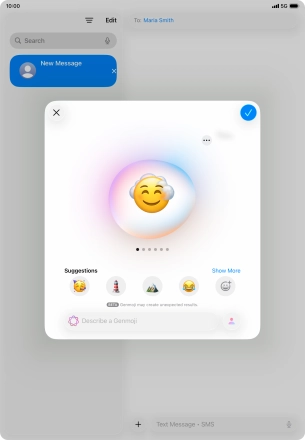
Write in your own words what you would like your Genmoji to look like, and press arrow up.


2. Use Genmoji
Slide your finger right or left on the screen to see the generated results.
2. Use Genmoji
To use the selected Genmoji in your message, press the confirm icon.
2. Use Genmoji
To access more functions for the selected Genmoji, press the menu icon and follow the instructions on the screen to use them.
3. Use Writing Tools
Open a supported app, such as Notes, and key in the required text.


3. Use Writing Tools
Press the extended menu icon.


3. Use Writing Tools
Press Writing Tools.


3. Use Writing Tools
Press Describe your change and write in your own words how you would like the text to be rewritten. Follow the instructions on the screen to use the function.
3. Use Writing Tools
To check the text for grammatical and spelling errors, press Proofread and follow the instructions on the screen to use the function.
3. Use Writing Tools
To perform an automatic rewrite of the text, press Rewrite and follow the instructions on the screen to use the function.
3. Use Writing Tools
To change the writing style of the text, press the required writing style and follow the instructions on the screen to use the function.
3. Use Writing Tools
To format the text, press the required format and follow the instructions on the screen to use the function.
3. Use Writing Tools
To generate a text using ChatGPT, press Compose and follow the instructions on the screen to use the function.
1. Turn on Apple Intelligence


2. Use Genmoji


3. Use Writing Tools


Thank you for your evaluation!
Thank you for your evaluation!