MobiWire Dakota

MobiWire Dakota

I can't send and receive picture messages on my MobiWire Dakota Proprietary OS

Cause 3 of 4: The phone has not been correctly set up for MMS

To send and receive MMS, your phone needs to be correctly set up for MMS.

Solution: Set up your phone for picture messaging.

Step 1 of 25

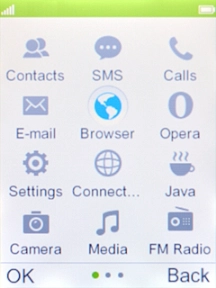
Find "Data accounts"

Press the Navigation key.

Step 2 of 25

Find "Data accounts"

Select Connected.

Step 3 of 25

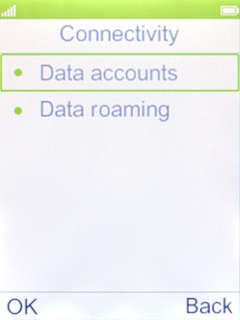
Find "Data accounts"

Select Data accounts.

Step 4 of 25

Create new data connection

Press the Left selection key.

Step 5 of 25

Create new data connection

Select Add PS account.

Vodafone MMS
Step 6 of 25

Create new data connection

Highlight the field below "Account name" and key in Vodafone MMS.

live.vodafone.com
Step 7 of 25

Enter APN

Highlight the field below "APN" and key in live.vodafone.com.

Step 8 of 25

Select authentication type

Highlight the field below "Auth. type".

Step 9 of 25

Select authentication type

Select Normal.

http://pxt.vodafone.net.au/pxtsend
Step 10 of 25

Select picture messaging server

Highlight the field below "Homepage" and key in http://pxt.vodafone.net.au/pxtsend.

Step 11 of 25

Select connection type

Highlight the field below "Connection type".

Step 12 of 25

Select connection type

Select HTTP.

Step 13 of 25

Turn on use of proxy

Highlight the field below "Use proxy".

Step 14 of 25

Turn on use of proxy

Select Yes to turn on the function.

10.202.002.060
Step 15 of 25

Enter IP address

Highlight the field below "Proxy address" and key in 10.202.002.060.

8080
Step 16 of 25

Enter port number

Highlight the field below "Proxy port" and key in 8080.

Step 17 of 25

Enter port number

Press the Right selection key.

Step 18 of 25

Save data connection

Press the Right selection key.

Step 19 of 25

Return to the home screen

Press Disconnect to return to the home screen.

Step 20 of 25

Find "Multimedia message"

Press the Left selection key.

Step 21 of 25

Find "Multimedia message"

Press the Left selection key.

Step 22 of 25

Find "Multimedia message"

Select Multimedia message.

Step 23 of 25

Active data connection

Select Data account.

Step 24 of 25

Active data connection

Select the required data connection.

Step 25 of 25

Return to the home screen

Press Disconnect to return to the home screen.

1 Find "Data accounts"

Press the Navigation key.
Select Connected.
Select Data accounts.

2 Create new data connection

Press the Left selection key.
Select Add PS account.
Highlight the field below "Account name" and key in Vodafone MMS.
Vodafone MMS

3 Enter APN

Highlight the field below "APN" and key in live.vodafone.com.
live.vodafone.com

4 Select authentication type

Highlight the field below "Auth. type".
Select Normal.

5 Select picture messaging server

Highlight the field below "Homepage" and key in http://pxt.vodafone.net.au/pxtsend.
http://pxt.vodafone.net.au/pxtsend

6 Select connection type

Highlight the field below "Connection type".
Select HTTP.

7 Turn on use of proxy

Highlight the field below "Use proxy".
Select Yes to turn on the function.

8 Enter IP address

Highlight the field below "Proxy address" and key in 10.202.002.060.
10.202.002.060

9 Enter port number

Highlight the field below "Proxy port" and key in 8080.
8080
Press the Right selection key.

10 Save data connection

Press the Right selection key.

11 Return to the home screen

Press Disconnect to return to the home screen.

12 Find "Multimedia message"

Press the Left selection key.
Select Multimedia message.

13 Active data connection

Select Data account.
Select the required data connection.

14 Return to the home screen

Press Disconnect to return to the home screen.

Did this solve the problem?

Yes - All solved No - Go to next cause

Get information on...

Or select...

Another device