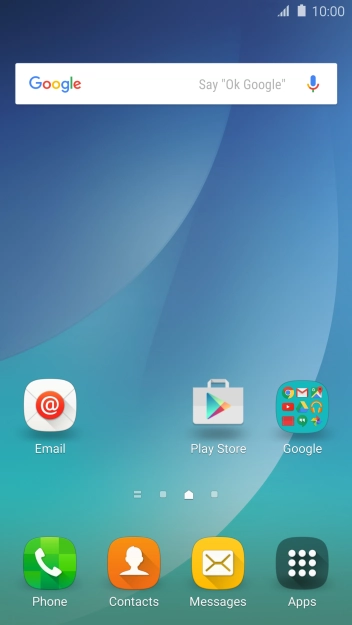
1. Open the address book
Press Contacts.
![](http://wmstatic.global.ssl.fastly.net/ml/7100822-f-2324a790-5534-4bc5-86e7-4eed633d09a3.png?width=222&height=394)
2. Create contact
Press the new contact icon.
![](http://wmstatic.global.ssl.fastly.net/ml/7100822-f-2ea19b73-c37e-46f4-8d01-c9ee0c92dbeb.png?width=222&height=394)
3. Select address book
Press the address book drop down list.
![](http://wmstatic.global.ssl.fastly.net/ml/7100822-f-493ea838-fef2-4172-80b5-c462b9516e48.png?width=222&height=394)
Press Device.
![](http://wmstatic.global.ssl.fastly.net/ml/7100822-f-59eddd6d-f0e6-4af1-9be5-6f8455be9fee.png?width=222&height=394)
4. Add picture
Press the picture icon.
![](http://wmstatic.global.ssl.fastly.net/ml/7100822-f-6a205793-a669-47b2-91bb-4937435828d6.png?width=222&height=394)
Press the gallery icon.
![](http://wmstatic.global.ssl.fastly.net/ml/7100822-f-aff7c55f-29cc-44fb-b3cb-fc7b9c520d65.png?width=222&height=394)
Press the drop down list in the top left corner of the screen.
![](http://wmstatic.global.ssl.fastly.net/ml/7100822-f-ab331b00-0f41-4118-8b51-ddfd1f0ed1ef.png?width=222&height=394)
Press Albums and go to the required folder.
![](http://wmstatic.global.ssl.fastly.net/ml/7100822-f-c1dc43b2-794b-470b-8eca-b48f11353321.png?width=222&height=394)
Press the required picture.
![](http://wmstatic.global.ssl.fastly.net/ml/7100822-f-eb55994f-fd01-4a7f-8816-d6e4c1993754.png?width=222&height=394)
Drag the frame to the required position to select the required detail and press DONE.
![](http://wmstatic.global.ssl.fastly.net/ml/7100822-f-bd46d4a6-5ac7-4150-8018-d6ef901188e4.png?width=222&height=394)
5. Enter name
Press Name and key in the required name.
![](http://wmstatic.global.ssl.fastly.net/ml/7100822-f-d694f4b9-c009-4062-92af-9af14313a6fb.png?width=222&height=394)
6. Enter phone number
Press Phone number and key in the required phone number.
![](http://wmstatic.global.ssl.fastly.net/ml/7100822-f-a3597d62-9893-4adb-a6f7-26ba12f4ba83.png?width=222&height=394)
Press the field next to the phone number.
![](http://wmstatic.global.ssl.fastly.net/ml/7100822-f-d589ce43-1271-4303-a8af-d0eda2bf052b.png?width=222&height=394)
Press the required number type.
![](http://wmstatic.global.ssl.fastly.net/ml/7100822-f-c5ed60a5-2b72-4ad6-afa1-f5fe9d9238ab.png?width=222&height=394)
7. Enter email address
Press Email and key in the required email address.
![](http://wmstatic.global.ssl.fastly.net/ml/7100822-f-d589ce43-1271-4303-a8af-d0eda2bf052b.png?width=222&height=394)
Press the field next to the email address.
![](http://wmstatic.global.ssl.fastly.net/ml/7100822-f-6124e6e6-3455-4ffa-92c0-2980d9631b86.png?width=222&height=394)
Press the required email type.
![](http://wmstatic.global.ssl.fastly.net/ml/7100822-f-65fd5cf2-a6e9-4f87-9fc4-ed499a10cd13.png?width=222&height=394)
8. Assign a ring tone
Press ADD ANOTHER FIELD.
![](http://wmstatic.global.ssl.fastly.net/ml/7100822-f-6124e6e6-3455-4ffa-92c0-2980d9631b86.png?width=222&height=394)
Press Ringtone.
![](http://wmstatic.global.ssl.fastly.net/ml/7100822-f-ecb7b872-fc46-48c8-859e-23a5fa0bf0c7.png?width=222&height=394)
Press Ringtone.
![](http://wmstatic.global.ssl.fastly.net/ml/7100822-f-1ba0693e-efa2-4dfe-bb6c-358285c3d4ab.png?width=222&height=394)
Press the required ring tones to hear them.
![](http://wmstatic.global.ssl.fastly.net/ml/7100822-f-f899980d-51e7-493e-8439-d031ab8fff3e.png?width=222&height=394)
Once you've found a ring tone you like, press the Return key.
![](http://wmstatic.global.ssl.fastly.net/ml/7100822-f-f899980d-51e7-493e-8439-d031ab8fff3e.png?width=222&height=394)
9. Save contact
Press SAVE.
![](http://wmstatic.global.ssl.fastly.net/ml/7100822-f-1ba0693e-efa2-4dfe-bb6c-358285c3d4ab.png?width=222&height=394)
10. Return to the home screen
Press the Home key to return to the home screen.
![](http://wmstatic.global.ssl.fastly.net/ml/7100822-f-993b1cf9-d998-47d9-9d2a-86da7b91116e.png?width=222&height=394)
How would you rate your experience?
Thank you for your evaluation!
![](/Content/images/design_assets/vf-fb-logo.png)