1. Find "iCloud Backup"
Press Settings.
![](http://wmstatic.global.ssl.fastly.net/ml/7100822-f-a72e6ed0-4bf1-4f3f-afb6-6a34cc5f95b9.png?width=192&height=344)
Press your Apple ID.
![](http://wmstatic.global.ssl.fastly.net/ml/7100822-f-92f4112b-9455-4809-9a51-ed77ae99617c.png?width=192&height=344)
Press iCloud.
![](http://wmstatic.global.ssl.fastly.net/ml/7100822-f-680a46c8-c4f4-4c30-82e3-226a170b6515.png?width=192&height=344)
Press iCloud Backup.
![](http://wmstatic.global.ssl.fastly.net/ml/7100822-f-89f5bf23-eb5a-4314-b71d-2f89fb452c76.png?width=192&height=344)
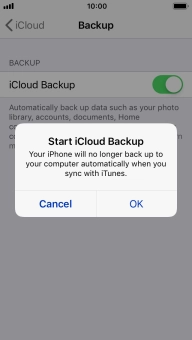
2. Turn on automatic iCloud backup
Press the indicator next to "iCloud Backup" to turn on the function.
![](http://wmstatic.global.ssl.fastly.net/ml/7100822-f-c955f902-daf0-4dc6-a8b7-4e4b6acd3345.png?width=192&height=344)
Press OK.
The phone memory will be backed up automatically when your phone is charging, the screen lock is turned on and a Wi-Fi connection is established.
![](http://wmstatic.global.ssl.fastly.net/ml/7100822-f-120077f6-d968-4135-b13d-65e6fdbae836.png?width=192&height=344)
3. Back up phone memory to iCloud
Press Back Up Now and wait while the phone memory is backed up.
![](http://wmstatic.global.ssl.fastly.net/ml/7100822-f-98fb2a86-4858-4a4a-bf97-5e6156aa37d2.png?width=192&height=344)
4. Return to the home screen
Press the Home key to return to the home screen.
![](http://wmstatic.global.ssl.fastly.net/ml/7100822-f-98fb2a86-4858-4a4a-bf97-5e6156aa37d2.png?width=192&height=344)
How would you rate your experience?
Thank you for your evaluation!
![](/Content/images/design_assets/vf-fb-logo.png)