Select FaceTime settings on your Apple iPhone 8 iOS 15.2

Read help info

You can make a video call to another device which supports FaceTime. To select settings for FaceTime, you need to activate your Apple ID on your phone.

Step 1 of 13

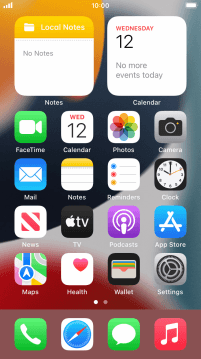
1. Find "FaceTime"

Press Settings.
Step 2 of 13

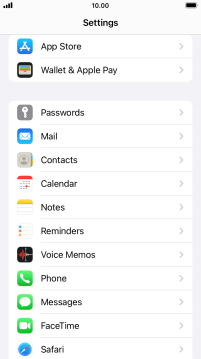
1. Find "FaceTime"

Press FaceTime.

Step 3 of 13

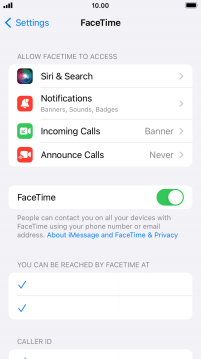
2. Turn FaceTime on or off

Press the indicator next to "FaceTime" to turn the function on or off.

Step 4 of 13

3. Select setting for how you would like to be contacted by others

Press the required setting below "YOU CAN BE REACHED BY FACETIME AT".

You can select the email addresses and phone numbers others can use to contact you using FaceTime.
Step 5 of 13

4. Select caller ID

Press the required setting below "CALLER ID".

You can select which phone number or email address to be displayed when you call others using FaceTime.
Step 6 of 13

5. Select FaceTime permissions

Press the required setting below "ALLOW FACETIME TO ACCESS" and follow the instructions on the screen to allow access for specific apps and functions.

Step 7 of 13

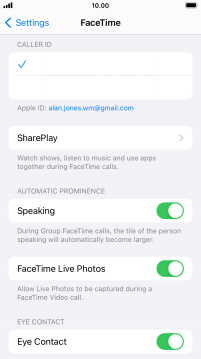
6. Turn display of big picture of speaker on or off

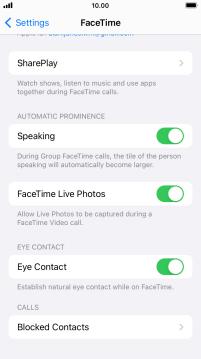
Press the indicator next to "Speaking" to turn the function on or off.

You can set FaceTime to display a big picture of the person currently speaking.
Step 8 of 13

7. Turn FaceTime Live Photos on or off

Press the indicator next to "FaceTime Live Photos" to turn the function on or off.

With Live Photos, the camera takes a series of pictures of the conversation within a number of seconds allowing you to save an animated version of the screen.
Step 9 of 13

8. Turn eye contact during conversation on or off

Press the indicator next to "Eye Contact" to turn the function on or off.

You can set FaceTime to establish natural eye contact during the conversation when you look at the screen instead of the camera.
Step 10 of 13

9. Block contact

Press Blocked Contacts.

Step 11 of 13

9. Block contact

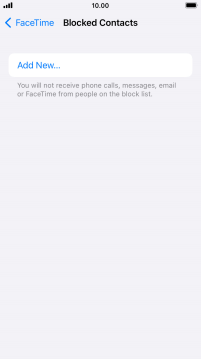
Press Add New... and follow the instructions on the screen to block a contact.

If you don't want to receive FaceTime calls from certain contacts, you can block them.
Step 12 of 13

9. Block contact

Press arrow left.

Step 13 of 13

10. Return to the home screen

Press the Home key to return to the home screen.

1. Find "FaceTime"

Press Settings.
Press FaceTime.
2. Turn FaceTime on or off

Press the indicator next to "FaceTime" to turn the function on or off.
3. Select setting for how you would like to be contacted by others

Press the required setting below "YOU CAN BE REACHED BY FACETIME AT".
You can select the email addresses and phone numbers others can use to contact you using FaceTime.

4. Select caller ID

Press the required setting below "CALLER ID".
You can select which phone number or email address to be displayed when you call others using FaceTime.
5. Select FaceTime permissions

Press the required setting below "ALLOW FACETIME TO ACCESS" and follow the instructions on the screen to allow access for specific apps and functions.

6. Turn display of big picture of speaker on or off

Press the indicator next to "Speaking" to turn the function on or off.
You can set FaceTime to display a big picture of the person currently speaking.

7. Turn FaceTime Live Photos on or off

Press the indicator next to "FaceTime Live Photos" to turn the function on or off.
With Live Photos, the camera takes a series of pictures of the conversation within a number of seconds allowing you to save an animated version of the screen.

8. Turn eye contact during conversation on or off

Press the indicator next to "Eye Contact" to turn the function on or off.
You can set FaceTime to establish natural eye contact during the conversation when you look at the screen instead of the camera.

9. Block contact

Press Blocked Contacts.
Press Add New... and follow the instructions on the screen to block a contact.
If you don't want to receive FaceTime calls from certain contacts, you can block them.
Press arrow left.

10. Return to the home screen

Press the Home key to return to the home screen.

Get information on...

Or select...

Another device